

Kubernetes
Overview
Kubit KaaS (Kubernetes as a Service) is an integrated platform for creating, managing, and scaling Kubernetes clusters on Kubit's cloud infrastructure.
With this service, you can create a dedicated Kubernetes cluster with just a few clicks, choose your desired Kubernetes version, automatically provision computational resources, and monitor the health of cluster components at any time.
KaaS is designed for development, operations, and DevOps teams so they can create reliable, production-ready environments for running services and containers without the need for complex infrastructure configuration.
Creating a New Cluster
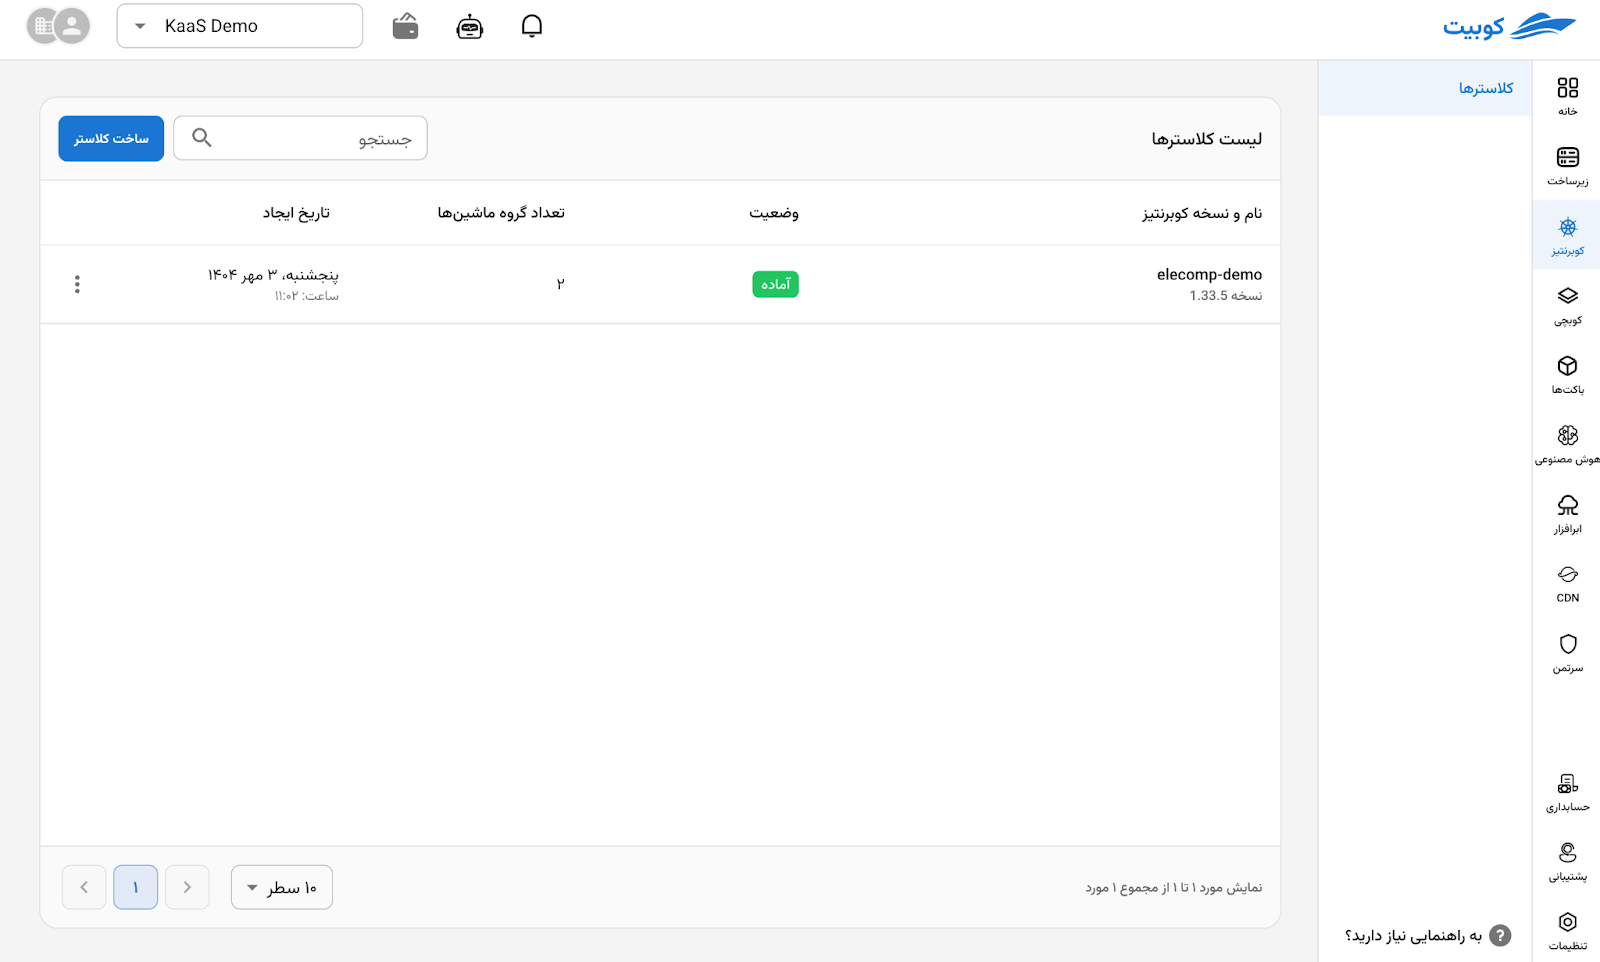
Step 1 — Navigate to the "Kubernetes" Section
After logging into your Kubit dashboard, select Kubernetes from the right-side menu.
This section displays a list of all your existing clusters. To create a new cluster, click the Create Cluster button.
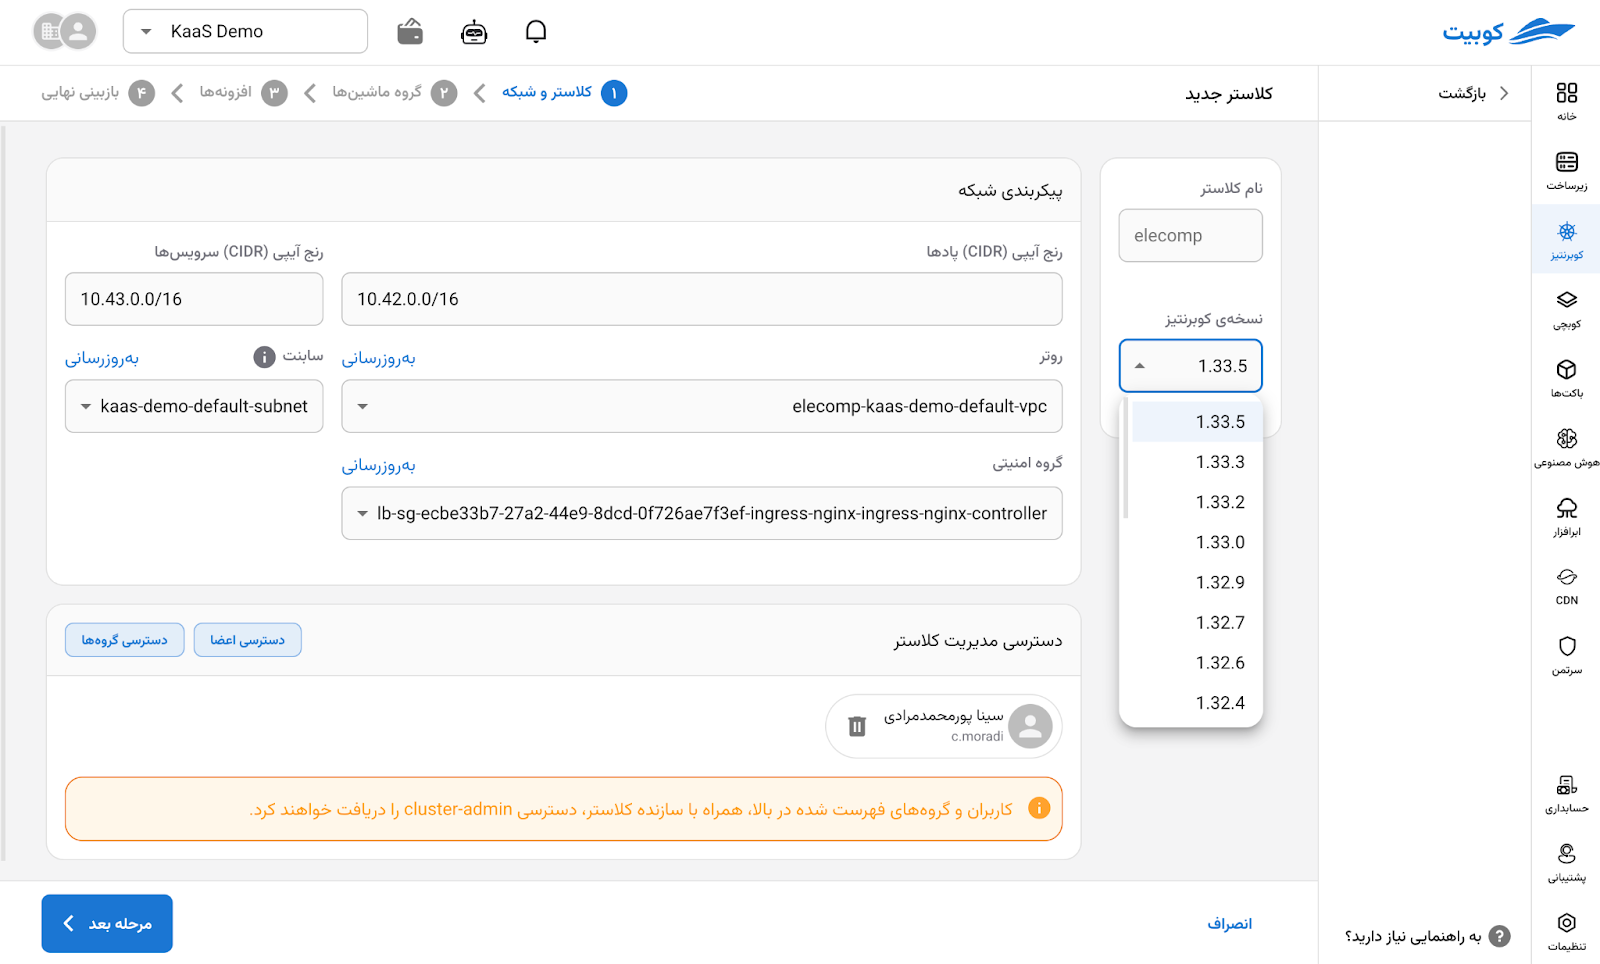
Cluster and Network Configuration
In the first step, you need to specify the cluster name and network settings.
Fields and Options
-
Cluster Name: A custom name for the new cluster (e.g., elecomp).
-
Kubernetes Version: Select your desired version from the list. KaaS supports multiple stable Kubernetes versions (e.g., 1.33.5).
-
Pod and Service IP Range (CIDR): Default values are suggested for the internal Kubernetes network; editable if needed.
-
Router: Select the virtual network (VPC) associated with the cluster.
-
Security Group: Firewall and access settings for the cluster.
💡 Note: Users or groups added at this step will have Cluster Admin access along with the cluster creator.
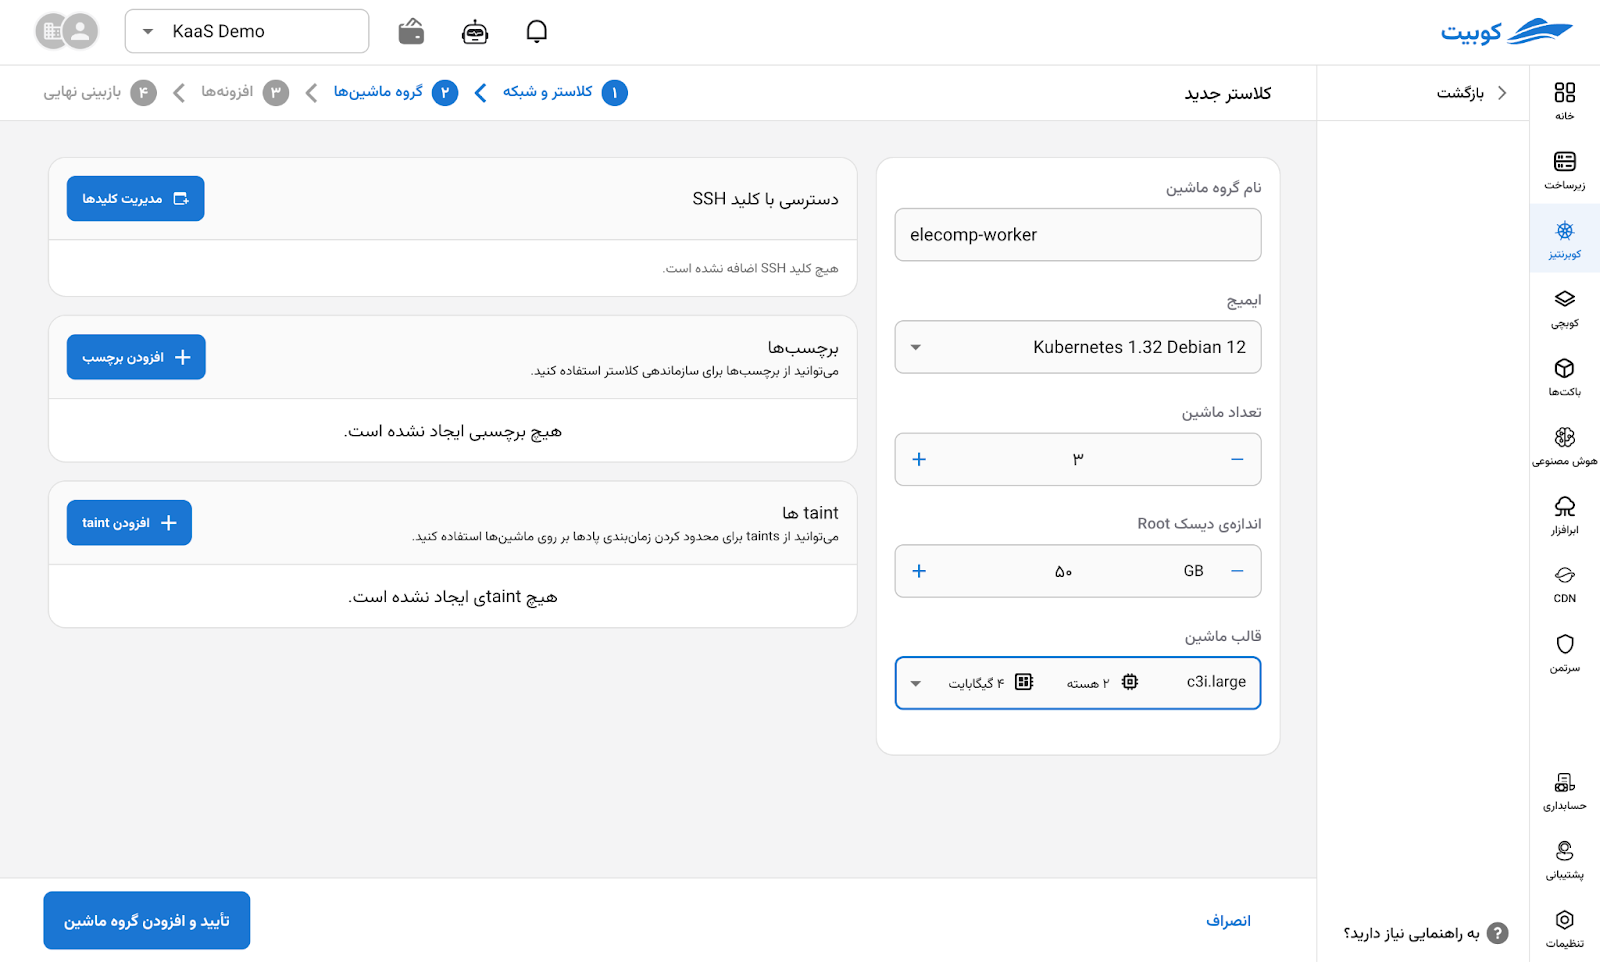
Step 2 — Define Node Groups
In this step, you can specify the computational resources for your cluster. Each Node Group is a set of nodes that run with the same configuration. This section lets you define processing capacity, machine sizes, and specific settings for each group.
Main Node Group Settings
-
Group Name: A custom name for the node group (e.g., elecomp-worker).
-
OS Image: The operating system and Kubernetes version for the nodes, e.g., Kubernetes 1.32 Debian 12.
-
Number of Machines: The number of nodes to create in this group.
-
Root Disk Size: The main disk size for each machine, in gigabytes (GB).
-
Flavor: Choose the machine type based on hardware resources (e.g., c3i.large with 2 CPU cores and 4 GB RAM).
💡 Note: The choice of machine type directly affects cluster performance and cost. Use smaller flavors for test environments and larger ones for high-demand services.
Adding Labels and Taints
Labels and Taints are used to organize and schedule pods on nodes.
-
Labels: Used to group machines or define their role in the cluster (e.g., role=worker).
-
Taints: Used to restrict pod deployment on specific nodes. Only pods with a compatible Toleration will be scheduled on Tainted nodes.
You can add multiple labels or Taints as needed. This section is optional and you can proceed without it.
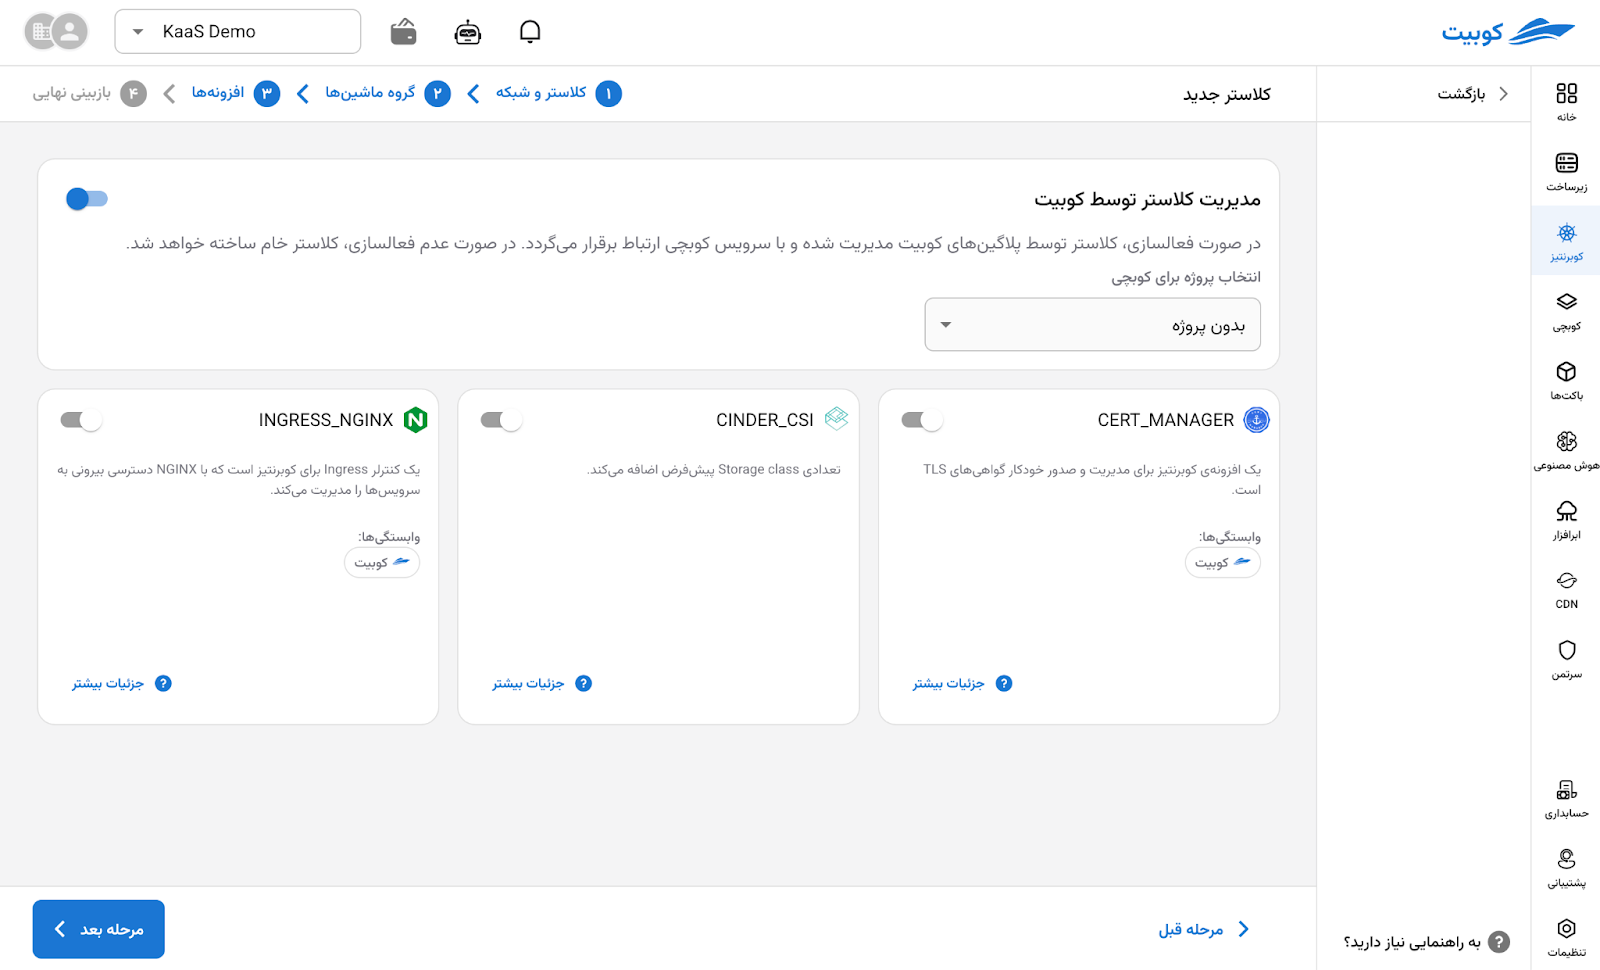
Step 3 — Select Add-ons
In this section, you can enable management plugins and add-ons for your cluster.
Add-ons are tools that provide specific capabilities such as certificate management, Ingress control, or adding StorageClass.
Available Add-ons
-
Ingress NGINX: An Ingress Controller for managing incoming traffic to services through NGINX.
-
Cinder CSI (Block Storage): Adds StorageClass and block volume management through Cinder.
-
Shared Storage CSI: Provides StorageClass for shared storage between pods.
-
Cert Manager: Automatic issuance and management of TLS certificates for in-cluster services.
-
Cluster Autoscaler: Automatically scale cluster nodes based on workload demand and requirements.
-
API Server Audit Log: Log and monitor API Server requests for security and audit purposes.
-
Default Storage Classes: Define default StorageClasses for the cluster.
💡 If this section is not enabled, the cluster will be created without add-ons. You can install add-ons later.
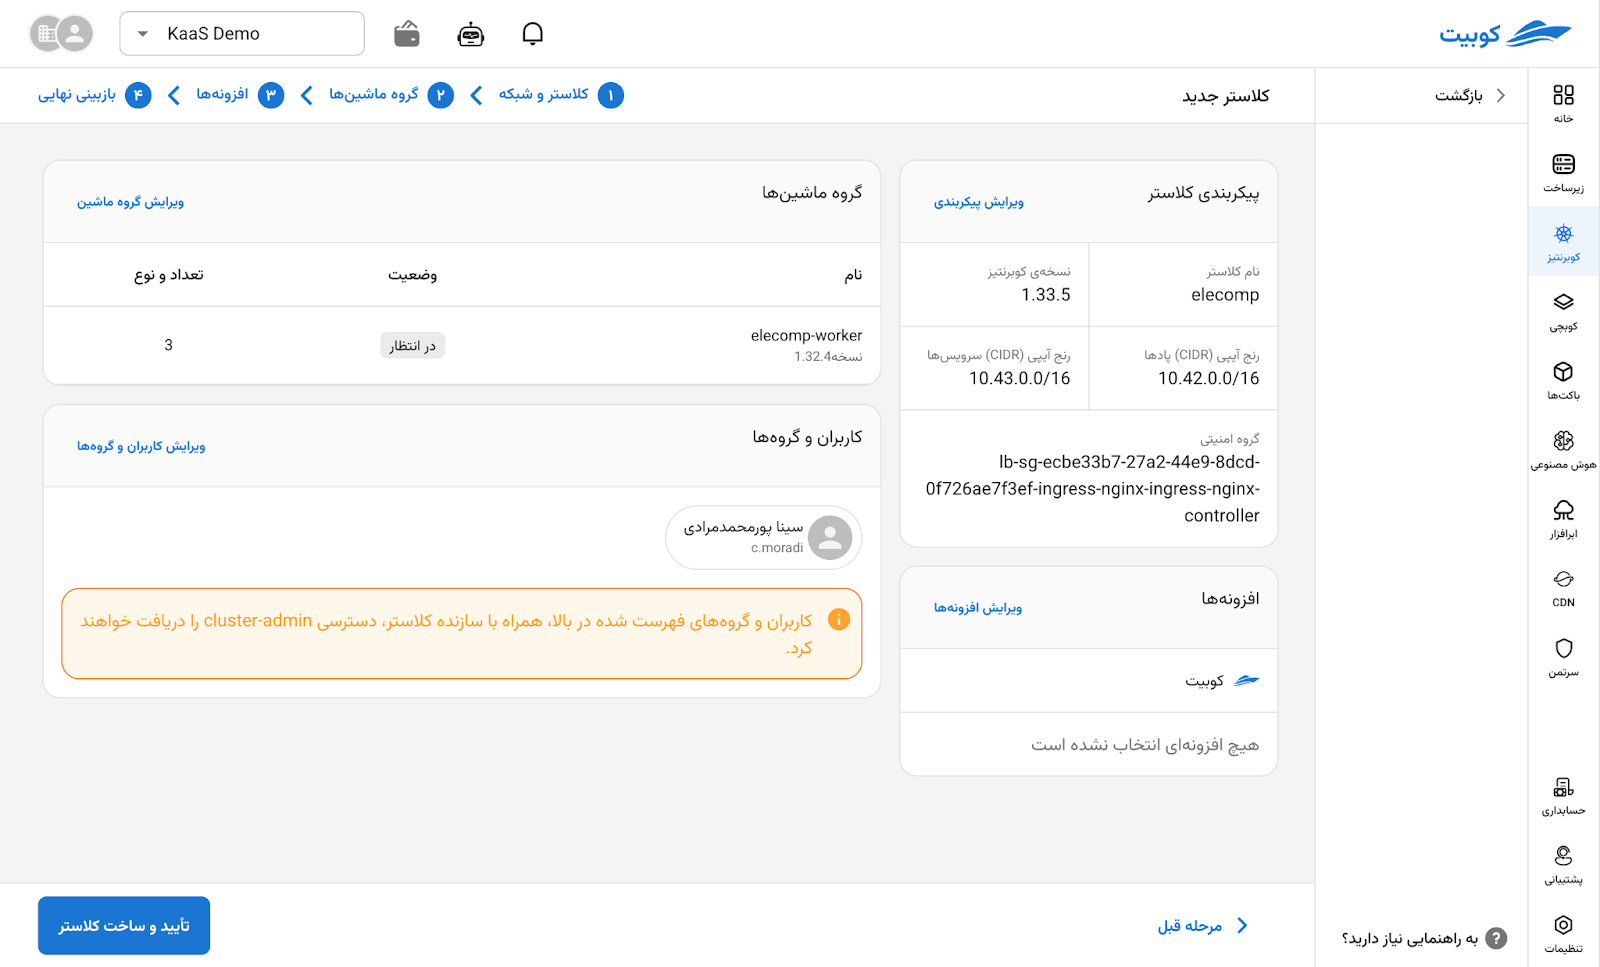
Step 4 — Final Review and Cluster Creation
In the final step, a summary of your settings is displayed:
-
Kubernetes version
-
Network ranges
-
Node groups and number of nodes
-
Selected add-ons
-
Users with administrative access (Cluster Admin)
If everything is correct, click the Confirm and Create Cluster button.
The creation process takes a few minutes depending on the selected resources. Once complete, the cluster status in the list will change to Ready.
Monitoring Cluster Status
After the creation process completes, your cluster enters the Creating state. Depending on the selected resources and enabled add-ons, this phase may take a few minutes.
When all core Kubernetes services are ready the status changes to Ready and your cluster becomes available.
Cluster States
At any given moment, a cluster is in one of the following states:
-
Ready: The cluster is fully operational and available for use.
-
Creating: The cluster is being set up for the first time.
-
Updating: One or more node groups are being created, modified, or deleted.
-
Deleting: The cluster is being cleaned up and removed.
💡 Note: If one of the node groups encounters an error, the cluster status still shows Ready because the cluster itself is healthy.
Cluster Overview
On the Overview page, a summary of the cluster's specifications and status is available:
-
Cluster name and Kubernetes version
-
Pod and service IP range (CIDR)
-
Cluster creation date
-
Node group status
-
Security group and enabled add-ons
-
Users with administrative access (Cluster Admin)
-
Upgrade availability: If a newer Kubernetes version is available, an upgrade indicator is shown. Two types of upgrades may be displayed:
- Patch upgrade: A newer patch within the same minor version (e.g., 1.32.3 → 1.32.5)
- Minor upgrade: A newer minor version (e.g., 1.32.x → 1.33.x)
💡 Note: From this section, you can access the cluster's administrative settings, node management, and add-ons.
Kubernetes Component Status
At the bottom of the page, the status of key Kubernetes services is displayed.
Each component is marked with a green status and the Ready label when it becomes available.
Main services include:
-
API Server: The Kubernetes command center for communication between the user and the cluster
-
Etcd: Kubernetes's internal database for storing configuration and state
-
Scheduler: Responsible for scheduling pods on nodes
When all of these services reach the Ready state, your cluster is fully active and operational.
Managing the Cluster After Creation
After the cluster is ready, you can access the administrative sections from the right-side menu:
-
Node Group Management: Add or remove nodes, change resource settings. Node groups in Error state are immediately removed upon deletion request.
-
Add-on Management: Enable or disable plugins such as NGINX or Cert Manager
-
Cluster Settings: Change network settings, access controls, or administrative users
⚠️ Warning: Editing cluster settings is only possible when the cluster is in Ready or Updating state. In other states (e.g., Creating or Deleting), this option is temporarily unavailable.
💡 If you need other users to have access to the cluster, use the Member and Group Access section. Added users will receive the access level you specify.
Deleting a Cluster
To delete a cluster, select the Delete option from the cluster settings. When deleting, you are given an option to clean up volumes:
-
With volume cleanup (default): In addition to deleting the cluster, all Persistent Volumes inside it are permanently deleted.
-
Without volume cleanup: The cluster is deleted but the Persistent Volumes inside it are retained.
⚠️ Warning: Volume cleanup is irreversible. Make sure to back up any important data before enabling this option.